Abrasive belts are essential tools in many industries, from woodworking to metalworking, where they’re used to smooth and shape materials. But over time, these belts can wear down, requiring the need to splice them together to form an endless loop. This is where Abrasive Belt Joint Tape comes in, playing a crucial role in ensuring a durable, seamless connection between the two ends of the belt.
In this post, we'll discuss how to effectively use Abrasive Belt Joint Tape for splicing, covering different types of joints and processes, and offering helpful tips to ensure a strong, long-lasting bond.
What is Abrasive Belt Joint Tape?
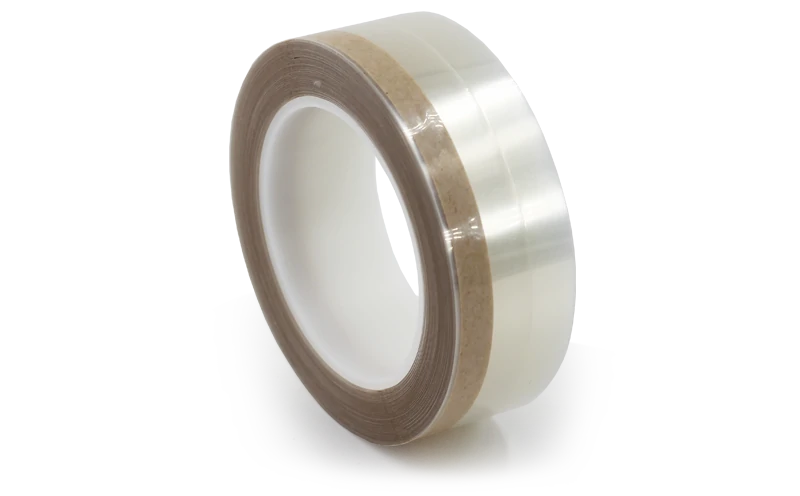
Abrasive Belt Joint Tape is a specialized tape used to join the ends of an abrasive belt. This tape is designed to withstand the high tension and abrasion of sanding and grinding operations. The process of creating an endless abrasive belt from a roll of abrasive paper or cloth requires splicing both ends together using the joint tape. The joint tape helps to secure the ends in place, forming a smooth, durable seam that won't interfere with the belt’s performance.
Types of Abrasive Belt Joints
There are several methods of splicing abrasive belts, and each requires a different type of splicing tape. These methods include:
1. Butt Splicing: In this technique, the two ends of the belt are aligned to abut against each other, and the joint is secured with a narrow strip of sanding belt joint tape on the reverse side. This is a simple, straightforward joint commonly used for many applications.
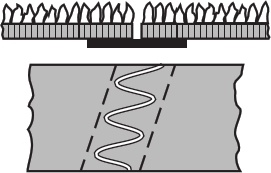
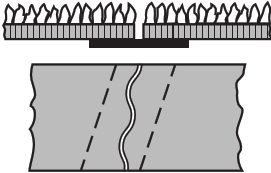
2. Zig-Zag Splicing: For this method, the ends of the belt are cut in a zig-zag pattern, and the joint is reinforced with sanding belt splicing tape. This joint helps to distribute the stress along the belt, improving durability and reducing the risk of the joint breaking under pressure.
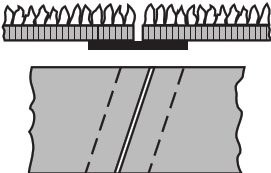
3. Straight Cut Joint at an Angle: A straight cut at a specific angle (typically 55˚, 57˚, or 75˚) is made to form the splice. The sanding belt joint tape is applied to the reverse side of the joint. This angled joint helps to prevent an abrupt transition at the junction and ensures smoother operation.
4. Wave Splicing: This technique involves cutting the ends of the belt into a wave-like pattern, and the joint is secured with sanding belt splicing tape. The wave pattern allows for a more flexible and dynamic connection, reducing strain on the belt during use.
|
Zig-zag joint with Sanding belts splicing tape on the reverse |
|
|
Straight cut at an angle to the running direction of the belt with Sanding belts splicing tape on the reverse |
|
|
Wave joint with Sanding belts splicing tape on the reverse |
|
Choosing the Right Abrasive Belt Joint Tape
The type of Abrasive Belt Joint Tape you use depends on the materials of the abrasive backing (such as paper, cloth, or plastic) and the application. Consider the following factors when choosing your tape:
Material of the Belt: Different backing materials may require different types of joint tape for optimal adhesion.
Application Requirements: Whether you're working with a sanding belt for woodworking, metalworking, or another purpose, ensure the tape is suited for the specific demands of the job.
Process of Splicing: Each splicing method may require a different tape thickness, length, or adhesive strength.
How to Apply Abrasive Belt Joint Tape
Applying Abrasive Belt Joint Tape involves careful preparation to ensure a smooth, effective splice. Here’s a step-by-step guide:
1. Prepare the Belt Ends: Ensure the ends of the belt are cut cleanly. The angle or pattern (butt, zig-zag, straight, or wave) should be precise to prevent any issues during splicing.
2. Clean the Surface: Before applying the tape, clean the reverse side of the belt to remove any dust or debris. A clean surface ensures the tape adheres properly.
3. Apply the Tape: Carefully position the abrasive belt joint tape over the splice area. Make sure the tape covers the entire joint, ensuring even contact across the width of the belt.
4. Press and Secure: Apply pressure to ensure the tape adheres well, and trim any excess tape. For a stronger bond, some users opt to apply additional pressure or heat, depending on the tape and belt materials.
5. Check the Joint: After applying the tape, inspect the joint to ensure it’s aligned correctly and firmly bonded. Run the belt at a low speed to ensure smooth operation before full use.
Benefits of Using Abrasive Belt Joint Tape
When used properly, sanding belt joint tape ensures a high-performance, durable splice that can withstand the rigors of sanding, grinding, and other abrasive tasks. Here are the key benefits:
Durability: Joint tape is designed to withstand heavy wear and tear, ensuring your belt lasts longer.
Smooth Transition: Proper splicing minimizes any abrupt transitions at the joint, leading to smoother operation.
Cost-Effectiveness: Splicing belts with joint tape can save money by extending the life of your abrasive belts.
Versatility: Depending on the type of joint and process, you can adapt the splicing tape to suit various applications and abrasive materials.
Conclusion
Using Abrasive Belt Joint Tape is an essential step in the maintenance of sanding belts, ensuring a strong, reliable connection between belt ends. By choosing the right type of tape and employing the correct splicing method (butt, zig-zag, angled cut, or wave), you can ensure your belts perform at their best. Whether you’re in woodworking, metalworking, or another industry, mastering the splicing process will not only enhance the longevity of your belts but also improve the overall efficiency of your sanding and grinding operations.